Team Management
Every member of your yearbook committee needs their own personal username & password.
School advisers specified as the primary contacts by their yearbook company/photo studio will have accounts set up for them in both Pixami and the Studio Source Dashboard. Advisers will receive a Dashboard welcome email when their user accounts have been set up on both sites. Once the adviser logs into their Dashboard (the admin portal to manage the yearbook project), they will find login info and a direct link to log into Pixami (the yearbook design software site).
Assistant, volunteer and student designer accounts are set up by the advisers directly in Pixami. Advisers create and manage user accounts for their team following the procedures outlined below. These designers should be provided with credentials by their adviser to into Pixami directly (https://bookbuilder.pixami.com/), not the Studio Source Dashboard.
Unique Login Importance
The Adviser should immediately set up separate user logins for all other persons who need to work on the yearbook. Users should never share a single login for the following reasons:
- No Page Assignments: You cannot assign pages to individuals – no one will be responsible for a particular section or page in the book.
- No Progress Tracking: There will be no way to track who reviewed or commented on pages, or even submitted the yearbook for printing.
Note: If you do not have a unique login, please contact your Adviser and request a username of your own.
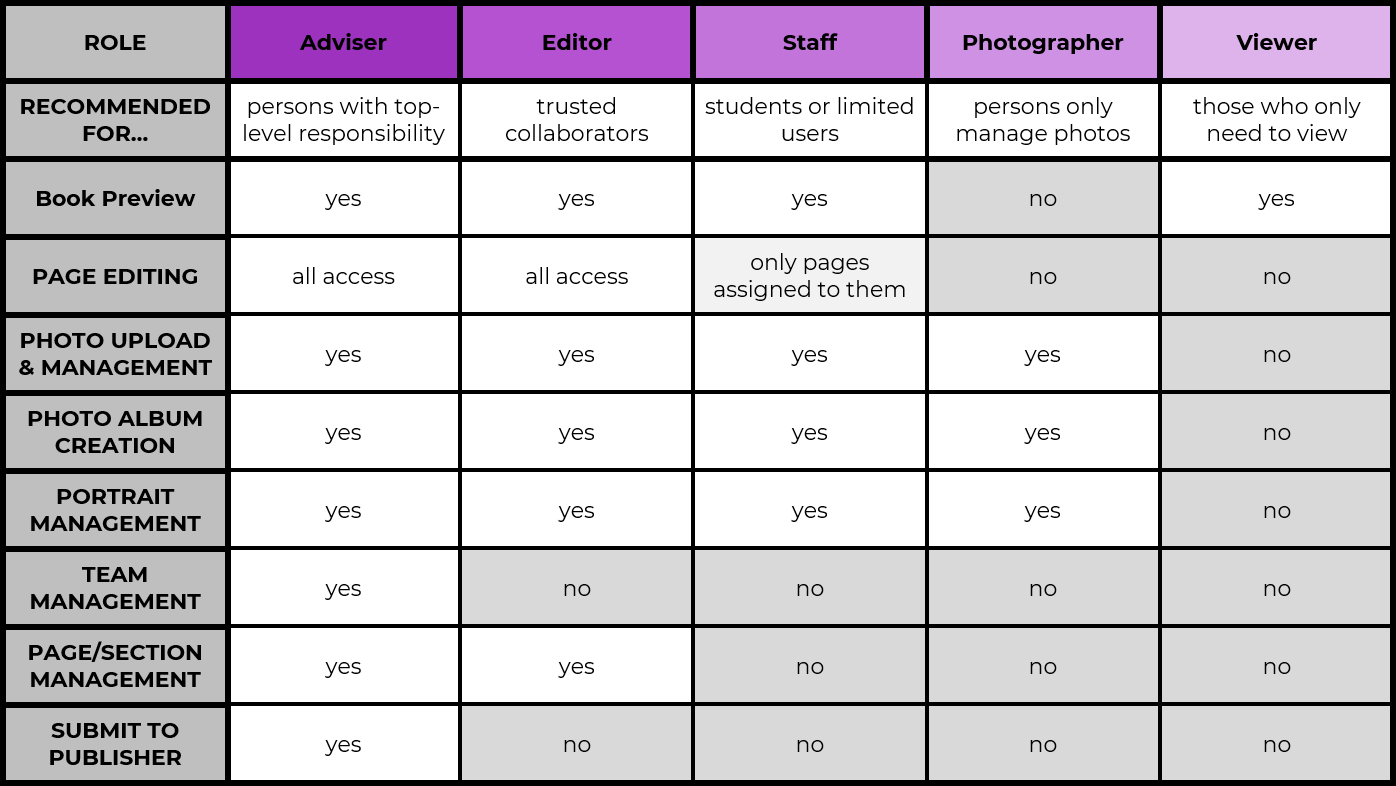
User Roles & Permissions
Users in Pixami are assigned a Role that will determine how much access they have to different parts of the yearbook. These can be changed at any time by an Adviser.
Tip: If an Adviser changes their role to Staff in order to assign a section to themselves, they will no longer have access all areas of the book. Please reach out to Studio Source Yearbooks support to have your Adviser role reinstated.
Adding & Deleting Users
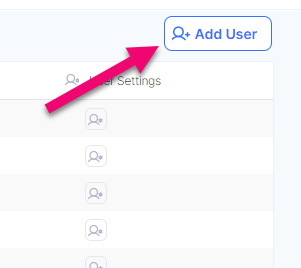
To access user management, click on the Users icon on the left menu bar, or click on Users on the Activity page’s quick links.

To add a user:
- Go to the Users page
- Click Add User
- Create a Login ID, Name, & Password
- Assign a User Role
- Click OK
Note: New users who are not in the Studio Source dashboard need to log in to https://bookbuilder.pixami.com/ to access the book. Check out Logging In to learn more.
Tip: Login IDs and Passwords are both space and case sensitive, so be sure to communicate to your new user their credentials exactly as you’ve typed them.

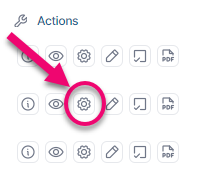
To delete a Uuser:
- Go to the Users Page
- Click the User Settings icon for the user to be deleted
- Change Role to None (Delete User)
- Click OK
Note: This user will no longer have access to the book.
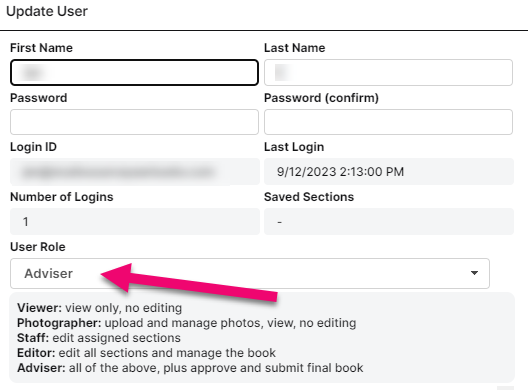
Changing a User Role
To change a user’s role:
- Go to the Users page
- Click the User Settings icon
- Click the dropdown menu for User Role
- Select the new Role
Assigning Users to Sections
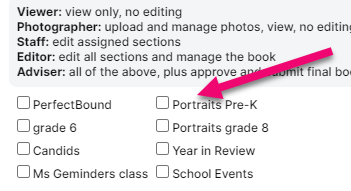
Users with a role of “staff” can be assigned to specific sections by an adviser. Staff users will only have access to the section(s) they are assigned to. Advisers can assign sections two different ways:
To assign by section:
- Go to the Yearbook page
- Click the Section Settings
- Check the Checkbox by the users name
To assign by user:
- Go to the Users page
- Click on the Users Settings icon
- Check the Checkbox next to the sections under Assign Sections
Note: The section options will only appear if the user role is Staff.