Collecting Photos from the School Community
Under the Photos tab, access the Photo Post folder to provide a safe sharing link to your school community. Collect candid classroom images, special events photos and even images to use for students who missed portrait day from members outside your team.
Create folders, share the link with teachers and parents, then review the submitted images before moving them to your Candid and Portrait folders. Because an adviser must review and move images, you will be able to be selective about what images are available to use in the editor on your pages. No “photo dumps” to clutter up your page building experience!
Note: Photo Post must be enabled in order to be used. If you do not see a Photo Post option under your Photos tab and would like to use it, contact the Studio Source support team.
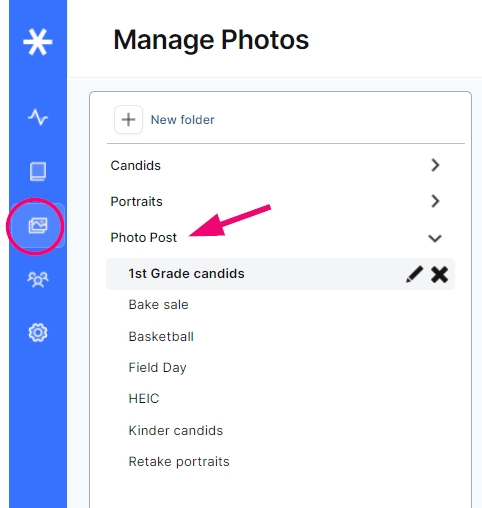
Setting Up Photo Post Folders
Prior to inviting people to contribute photos, first set up some thematic folders.

To create folders:
- Go to the Photos Page
- Click the Photo Post tab
- Click + New Folder
- Enter a name
- Click OK
Inviting the Community to Submit Photos
Staff, parents, & students can be invited to submit photos two different ways.
Invite
To send an invite with a link and instructions:
- Click the Photo Post tab
- Click Invite
- Enter an email address (multiple email addresses should be separated by semi-colons)
- Click OK

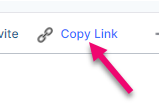
Copy Link
To copy a link to add to an email, newsletter, or text message:
- Click the Photo Post tab
- Click Copy Link
- Click OK
Step-by-Step Process to Upload Photos
After the link has been shared with the community, they will follow this step-by-step process to upload photos. No login is required.
To upload photos to Photo Post:
- Click the button in the email, the link posted on your school website, or social media page
- Select the folder you want to upload to
- Click the Upload button
- Click OK when prompted (it has Candid photos selected by default)
- Drag & Drop the image on the upload window or click the Add Files button to start the upload.
- Click Done when uploads are complete

After uploading the image, they will be prompted to add the type of photo (candid or portrait), the names of the people in the photo, and notes to help explain the photo.
Note: Photo Post users will not be able to see other user’s photo submissions, any yearbook photos, or access the yearbook software.
Selecting Submitted Photos for Your Yearbook
Photos uploaded to your Photo Post tab must be transferred to a Candid or Portrait folder to use in your book. This extra step ensures that any junior members of your team only have access to the images an adviser has approved, and lets you preselect images that are candidates to appear in the book.
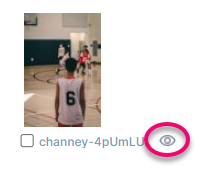
To preview the submitted photos:
- Click Photo Post
- Select a Folder
- Click the Preview/Info icon
- Click the Left or Right Arrows to Scroll through the folder
- Click the X to close
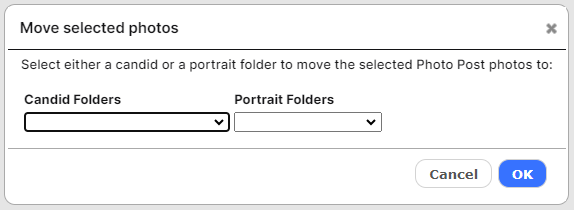
To move the selected photos to a Candid or Portrait folder:
- Click the Check Box below one or more photos
- Click Move
- Select a Candids or Portraits Folder
- Click OK
Tip: Any unwanted photos can be deleted from the Photo Post folder by clicking the check box, then clicking delete.
The Dos and Don’ts of Photo Contribution
Be sure to follow these rules to benefit from the Photo Post feature.
| PHOTO POST DOs | PHOTO POST DON’TS |
| Create folders to guide your contributors to a particular event or theme. | Don’t create folders for specific people or by date, or use only one album for all photos. Sorting and selection will be very difficult. |
| Ask photo contributors to selectively upload the best images – no duplicates or photo burst mode images. | Discourage contributors from “photo dumping” 100s of images from a single event. This creates more work for your design team. |
| Recruit photographers to contribute images early in the year. | Don’t assume someone has taken photos at an event – plan ahead to avoid disappointment. |
| Use original high quality photos take on phones and cameras. | Discourage community members from screenshotting their camera reel. These are low resolution, poor quality versions of the original photo! |