Page Editor Overview
The Page Editor provides a preview of the section you are working on, and allows you to customize each page individually. You can add layouts and backgrounds, photos, text captions, clip art, and make other design changes.
Opening a Section
To open a section for editing:
- Go to the Yearbook Page
- Locate the section to edit
- Click the Edit icon on the Yearbook Ladder or on the Section View
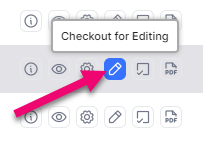
Note: Staffers may only open pages assigned to them. Advisers and Editors may open any page in the book. Only pages within the opened section may be viewed and edited.
Tip: To learn more about assigning pages to team members, check out the Team Management article.
Navigating the Page Editor
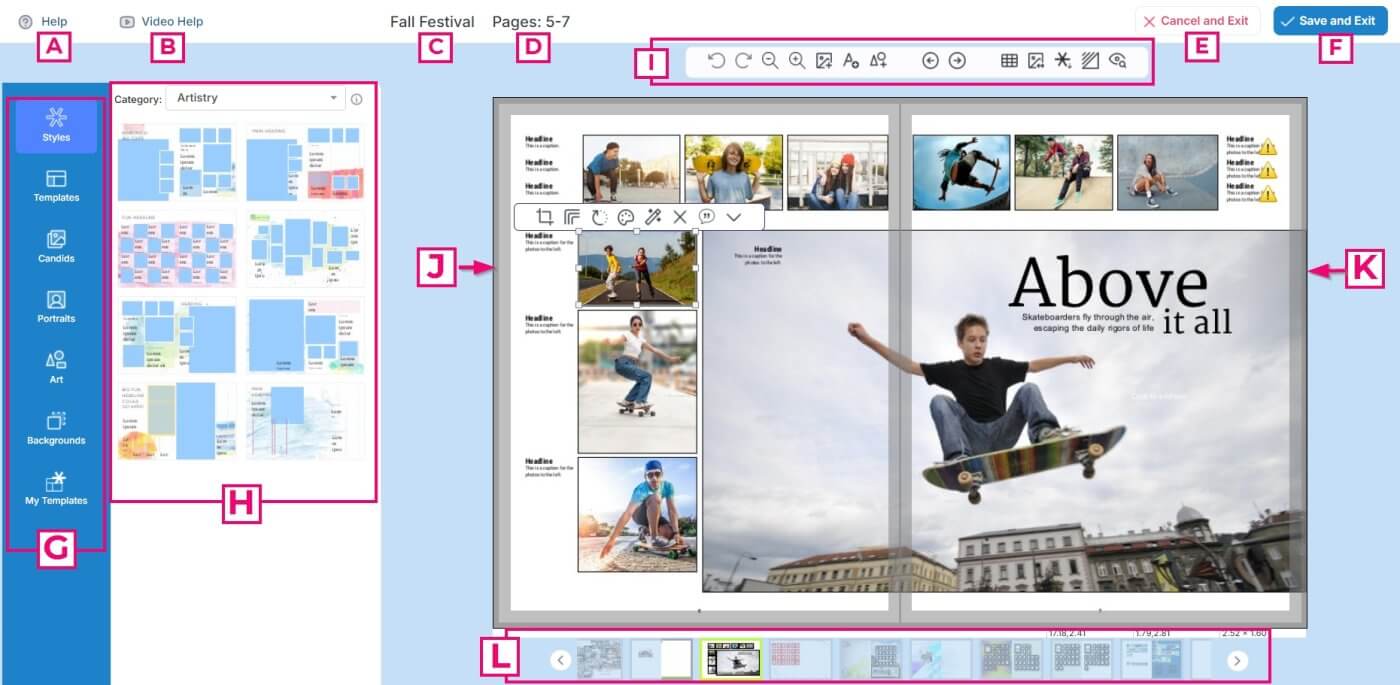
- A. Help – Current help or warning messages (A message indicator will appear when there is a new help message)
- B. Video Help – Video overview of the main features
- C. Section Name – Name of the current section being edited
- D. Pages – Page numbers of the current section being edited
- E. Cancel and Exit – Allows you to leave the Page Editor without saving any of your changes
- F. Save and Exit – Allows you to leave the Page Editor and save all of your changes
- G. Content Menu – Access templates, decorative embellishments, and photo collections
- H. Content Preview – Provides a preview of templates, decorative embellishments, and photo collections to drag and drop onto the page
- I. Main Toolbar – Provides access to the main features for working on your yearbook
- J. Left Side Page – Left side page of a double page spread
- K. Right Side Page – Right side page of a double page spread
- L. Page Navigation – Allows you to view and navigate the pages in the section
Tip: If you accidentally close your web browser before saving your work, don’t worry, all is not lost! Simply open your section back up in the Page Editor, then click Save & Exit to keep your work. Until you Save & Exit a section (or Cancel it), your team members will see the section as locked for editing on the ladder. Advisors can force-open sections from the yearbook ladder, which will delete all your progress since it was last saved, so be very sure to Save & Exit each time you have completed a design session.
Main Toolbar

- A. Undo / Redo – Reverse the previous action or reapply a reversed action. (You can undo up to 5 times in a row)
- B. Zoom In/Out- Enlarge or reduce the preview area to the optimum size for your needs.
- C. Add Image Frame – Add a new image frame to the page
- D Add Text Frame – Add a new text frame to the page
- E Add Shape Frame – Add a new shape frame to the page
- F. Previous/Next Page – Move forward and backward through the section.
- G. Grid – Turn on and adjust the grid and snaps to help with alignment of page content
- H. Flip Layout – Flips the current layout horizontally
- I. Save Layout – Save custom layouts to reuse on other pages
- J. Background – Colorize, adjust or clear the page background
- K. Preview – Preview the entire page and scroll through the book with no editor tools to obscure the view
Editing Pages
The interior pages are displayed as double-page spreads, editable individually or both at the same time (right or left side). Check out the Book Management article to learn more about your Book Structure and Page Management.
Interior Page Dimensions & Margins
Your interior page dimensions (length, width) are automatically preset based on the book type – usually trimmed to an 8.5″×11″ finished size. (Some books may be 9×12, as per your contract with your studio.)
The page editor displays pages surrounded by guidelines. These lines are used to assist you in placing your images, shapes, and text.
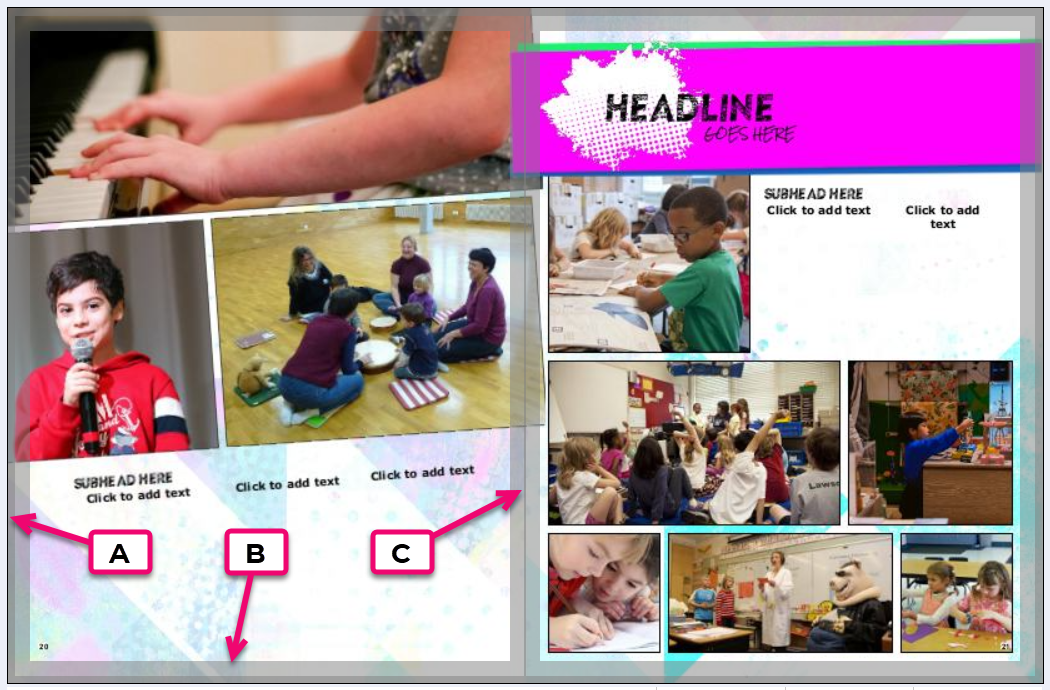
- A. Bleed Area – The dark gray border around the outside of the pages; this will be trimmed off the final printed page to ensure edge-to-edge printing
- Note: All background images or content purposely spilling off the page edges (eg. shapes, banners) must extend through the dark gray bleed area to the edge of the page so that no white unprinted border appears on the final printed page.
- B. Safe Margins – The light gray border indicates a “warning” area that may be slightly clipped after printing and trimming; all featured images and text should be within these safe margins to ensure they are not trimmed off of your final printed page
- C. Gutter – The area between the pages; images and text cannot be placed across the gutter to appear on both sides of the double-page spread.
Tip: Learn about Cover Guidelines & Margins and how they vary depending on book type in the Cover Design article.
Saving & Closing a Section
At the end of the editing session, be sure to close the editor:
To save the changes made in the editing session, choose Save and Exit.
To leave the editor without making any changes, choose Cancel and Exit.


Do not end an editing session by closing the web browser tab, closing the web browser, using the “page back” arrow on the browser, or turning off the computer. The section will remain checked out to all other users.
Advisers may force check-in a section:
If you are not concerned bout losing any work in progress, click on the force check-in button on the ladder to set a section back to “In progress” to allow another user to open it in the editor.

