Portraits: Import & Management
The Portraits tab is the area to upload and manage your school portraits. Your portraits may be uploaded by your school photographer, or you may be provided with a portrait package by your school photographer to import yourself. If you are unsure, please check with your yearbook company or school photographer.
Portraits Tab Overview
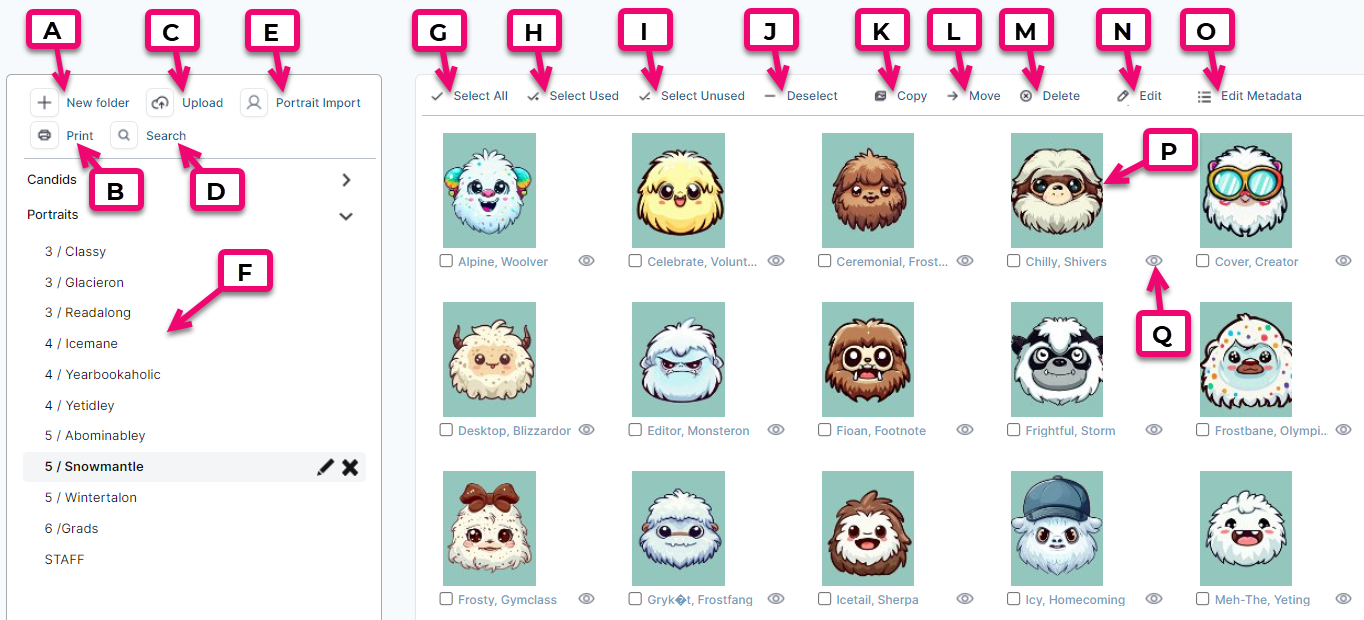
- A. New Folder: Used to add a new grade/classroom folder
- B. Print: Generates a printable proofing PDF to verify your portraits & data
- C. Upload: Used to upload additional portraits to a folder
- D. Search: Allows you to search for a specific photo by name
- E. Portrait Import: Allows you to import your portrait package
- F. Portrait Folder Menu: Shows a list of the current folders holding your portraits
- G. Select All: Allows you to select all portraits in a folder
- H. Select Used: Allows you to select the used portraits in a folder
- I. Select Unused: Allows you to select the unused portraits in a folder
- J. Deselect: Allows you to deselect the selected portraits in a folder
- K. Copy: Allows you to copy selected portraits to another folder
- L. Move: Allows you to move selected portraits to another folder
- M. Delete: Allows you to delete selected portraits
- N. Edit: Allows you to open a portrait in an image editor
- O. Edit Metadata: Allows you to make changes to the portrait data in a table format
- P. Portrait Thumbnail: Shows a small preview of the portrait image
- Q. Preview/Info: Shows a large preview of the portrait and the data associated to it
Importing Portraits
Before you are able to flow portrait pages into your yearbook, import your school’s portrait package into Pixami.
What is a PSPA?
Most photographers use a portrait package known as the PSPA (Professional School Photographers Association) format.
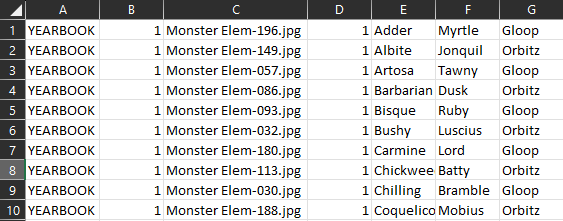
The package consists of one or more folders containing portrait images and a data file saved as Index.txt. This data file describes the people in the photos – names, grade, homeroom/teacher, etc.

The PSPA format assigns one row per person/photo. You can preview the index.txt file in a notepad-type application or open in in Excel. The columns contain data in a particular order, as listed below. The following categories are required to import and build pages in your yearbook. Additional categories may be included.
- A. Volume Name: School name or a default field, like “Yearbook”
- B. Image Folder: The name(s) of the folder(s) containing your images
- C. Image File Name (including file extension): File names given to the portrait photos, usually a .jpg
- D. Grade: Assigned to students and possibly teachers
- E. Last Name: Family name of the person in the portrait
- F. First Name: Given name of the person in the portrait
- G. Homeroom: A number corresponding to the homeroom
and/or - H. Teacher Name: Can be first and last or last name only
Tip: Check out the section on Portrait Upload FAQs if you encounter any problems with your PSPA.
Importing a PSPA Package
To import your portraits into Pixami, make sure your portrait package is available on your computer. If your portrait studio sent you a .zip file via a download link, unzip the package so you can access the photos and data file.
Step by Step
- Go to the Photos Page
- Click the Portraits tab
- Click the Portrait Import button
- Click Browse
- Locate & Select the portrait package that contains your images and your index.txt file
- Click OK
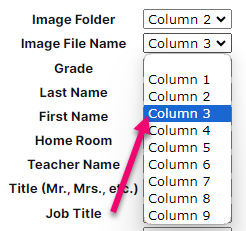
- Define Index Layout
- The contents of the index file will be organized into columns, displayed in preview at the top of the import window. Use the dropdown menus to specify the columns that correspond to the contents of the index.
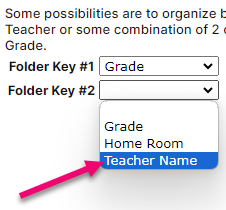
- Select the Folder Keys
- Folder Keys specify how you would like the portraits organized.
- If you choose Grade, your portraits will be placed in folders according to the grade of the students eg. K, 1, 2, 3, etc. Use this option if you flow your portraits by grade level (high schools, some middle schools).
- You can also choose more than one Folder Key. For example, if you choose Grade for Folder Key #1, and then Teacher for Folder Key #2, portraits will be organized in folders labeled Grade/Teacher, eg. 4/Smith, K/Brown. Use this option if you flow your portraits by homeroom groups (elementary schools, some middle schools).
- Click Next to continue the import.
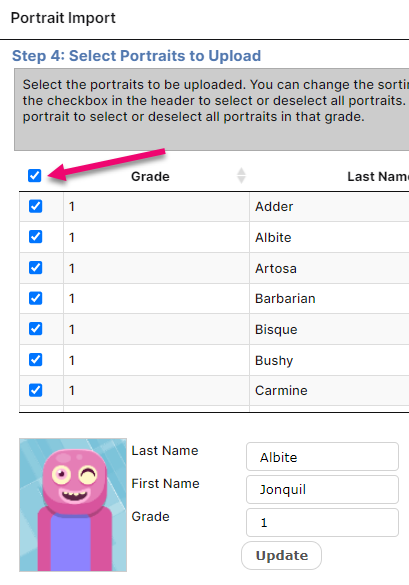
- By default all the portraits in your set will be selected to import. You can review the data, but it is easier to make corrections after the images are imported and sorted into folders.
- Click Next
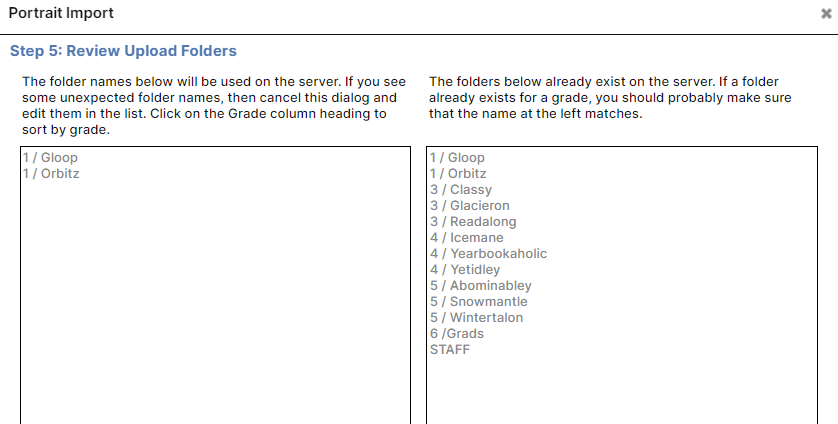
- Review Upload Folders
- The folder names to the right represent portrait folders that already exist in the software from any previous portrait upload sessions. (This will be empty if this is your first upload of portraits). The folder names on the left represent the new folders that will be created for this upload
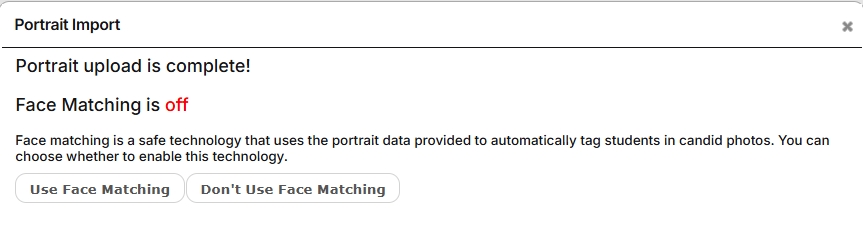
- Click Next to choose whether or not to use Face Matching on your portraits and candids. Complete details on this service is available in the Face Matching, Coverage Reports and Indexes article.
- Complete the import process.Should a second portrait package need to be imported, repeat the steps above.
Portrait Upload FAQs
Unfortunately, these are not easily fixed within any of our software offerings, but it is very easy to fix in your index.txt file prior to importing it.
To fix ALL CAPS in the index.txt file:
- Open the Index.txt file in Excel
- Identify the First and Last name columns (in this case E and F)
- Click on an Empty Cell in row 1
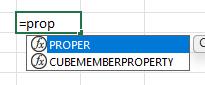
- Use the PROPER() formula to change text to Proper case
- Start typing =Proper
- Select Proper in the Function Menu
- Select E1 & type ) (the formula should appear as =Proper(E1)

- Click the Handle in the lower right corner of H1 and Drag to the right to select I1, then Drag all the way down to the last record in your database
- Release the mouse, excel will replicate the =PROPER() formula for each of the selected cells
- Click and Drag on the headers for columns H and I to select both entire columns
- Right click and select Copy
- Click and Drag on the headers for columns E and F to select both entire columns
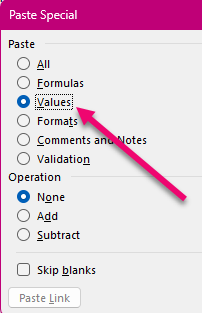
- Right click & select Paste Special
- Click Values ONLY
- Delete columns H & I
- Go to File > Save As… and save your file in .txt format in the same folder as your original index.txt file
Note: Your file must be named index.txt, so you will have to save over the original txt file.
Pixami will only import a .txt file. If you’ve received a .csv file format, simply rename it to a .txt and it will import without issue. Other formats may require you to import them into Excel or another spreadsheet application, then resave them to a .txt format.
If you have a excel database of file data and a folder of images, you can create a faux PSPA Databse pretty easily by following these steps:
- Create a new folder called “Images” in main folder
- Cut/Paste all portraits into new Images folder
- Insert 2 columns as first two columns, add “vol1” and “Images” as field data for all records in these two columns
- Cut/Paste Image Name column to make it column 3
- Cut/Paste Grade column to make it column 4
- Cut/Paste Last names into column 5
- Cut/Paste First names into column 6
- Cut/Paste Homeroom into column 7 (if there is one – otherwise skip this).
- Cut/Paste Period into column 8 (if there is one – otherwise skip this)
- Cut/Paste Teacher into column 9 (if there is one – otherwise skip this).
- Cut/Paste Track into column 10 (if there is one – otherwise skip this).
- Delete all remaining columns after Track…should have 10 columns total
- Review each column and check for missing data. It is generally easier to make changes to your data at this point than to do so later in the software. If you do not have information for those individuals, just add NA.
- Delete Header Row
- Save .txt file with name “index”
Occasionally a photographer will provide a portrait database package that is not PSPA format, but it will contain all the information needed to create portrait pages. The other information is simply not required.
To fix this issue:
- Open the data file in a spreadsheet software
- Delete the extra columns, keeping only the essential info (file name, first & last name, grade, homeroom, teacher, salutation, job title)
- Resave the datafile as a TXT format, using Save As… under a new file name to avoid overwriting the original file (eg. INDEXrevised.txt)
- Import this new index file into Pixami
If there are problems with importing the portrait images to accompany your database, check the Index file in a spreadsheet software or notepad application.
- Compare the actual file names of the portraits listed in the index file versus the actual portrait names
- The File Names in the data table MUST exactly match the actual names of the portrait files
- Check the index file for missing zeros starting the file name, typos or extra spaces, and ensure that the file name includes the JPG extension
Note: You may be able to manually correct the file names, but if you are not able to, ask your photographer for a new PSPA format table, explaining in detail what is wrong with the package you received.
If there are just a few missing photos, check to make sure the images were actually included in the portrait package. Ask your photographer for these missing images – they may be added to the portrait manager record directly without need to import all photos again.
Tip: If you feel that you still need help with these resolutions, please reach out to Studio Source Yearbooks Support for further assistance.
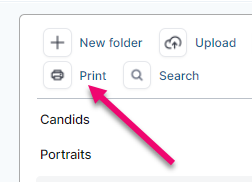
Want to proof your PSPA upload to make sure all of your portraits align with the correct information? Follow the steps below to print a PDF proof.
- Click the Print button
- Select the folders you would like to print
- Click OK
- A PDF will be generated
- Click the Link to the PDF when prompted
Managing Portrait Data
After you’ve uploaded your portraits from the PSPA, you may want to further organize or modify them.
Tip: When you make changes to your portraits, the layout of existing portrait pages will update automatically, if needed. It is important to review the portrait pages in the page editor to make sure everything looks the way you want. Some changes that may cause your existing portrait pages to update automatically include:
- Changing or correcting the first or last name associated with a portrait
- Adding a portrait or portraits to a class folder
- Removing a portrait or portraits from a class folder
- Moving a portrait or portraits from one class to another
Adding, Renaming, & Deleting Folders
To add a new folder:
- Click + New Folder
- Type a folder name
- Click OK
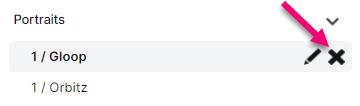
To rename a folder:
- Click the Pencil icon
- Type new name
- Click OK
To delete a folder:
Click the X icon next to the folder name.
Adding / Editing Portrait Data
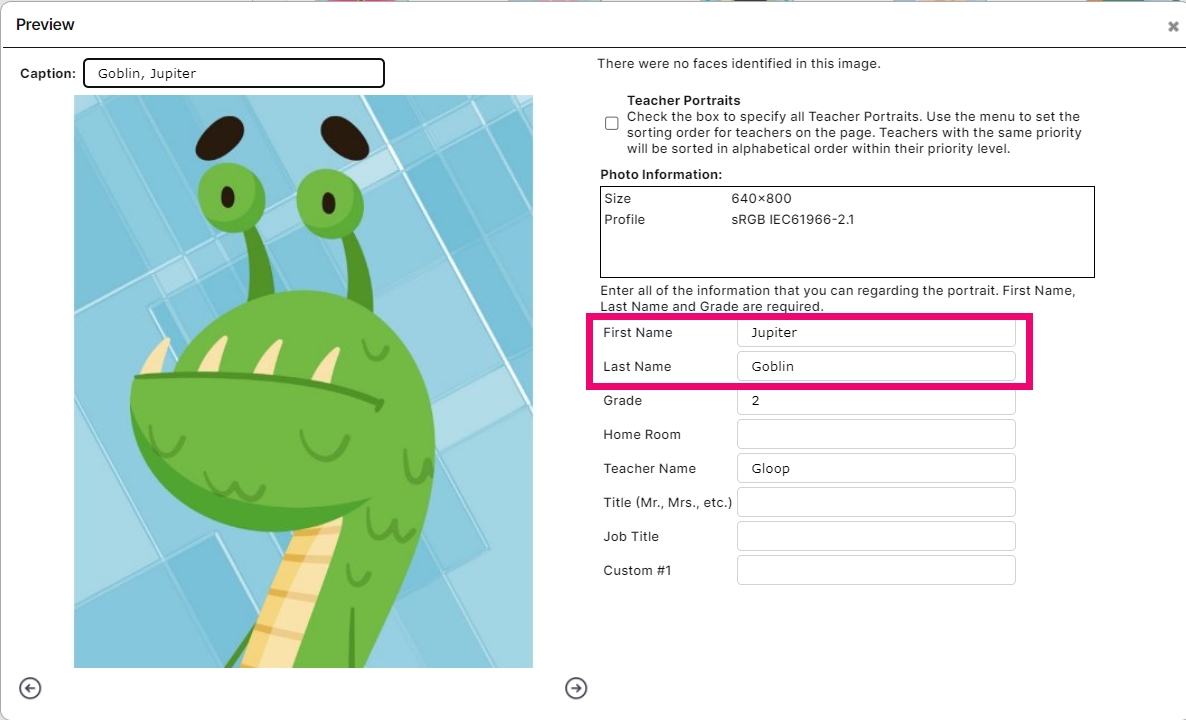
To add or edit data one portrait at a time:
- Click the Preview/Info icon next to the portrait.
- Update or Add info to the first and last name fields, or flag a staff portrait to move them to the front of their portrait grid.
- Use the Left or Right Arrows at the bottom to move to the next portrait
- Click the X when complete
Note: Changing grade or teacher info under the Preview/Info window will not reassign the portrait to a new group.
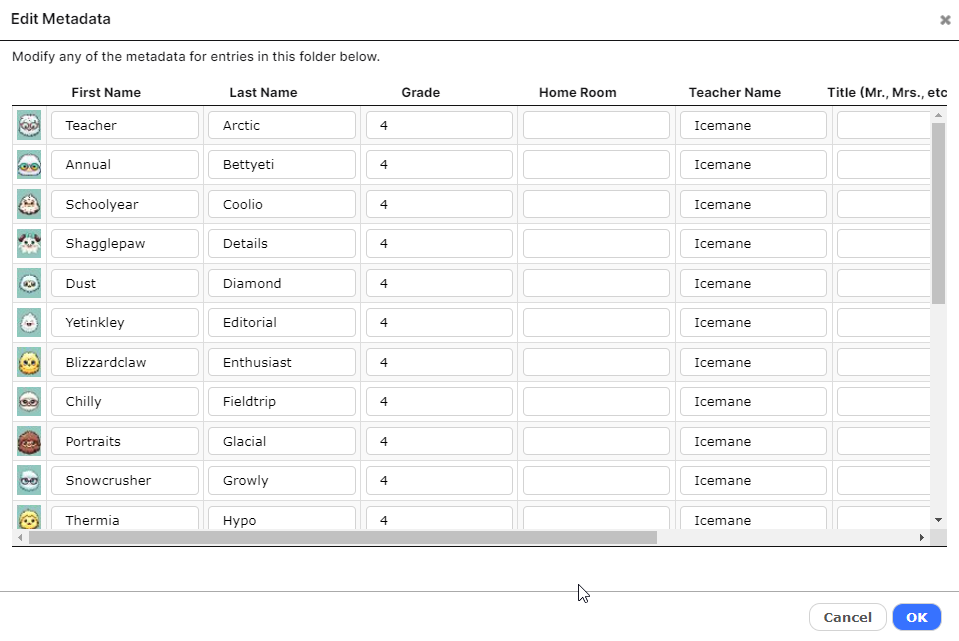
To add or edit data for multiple oortraits in a folder:
- Click Edit Metadata
- Click into each field to add or edit data in the columns
- Use the Scroll Bars to see additional columns and rows
- Click OK when complete
Note: Use this method to add senior quotes or add/change name info. Changing grade/teacher/homeroom info in this area will not move your portraits to a new group.
Adding, Replacing, or Deleting Portraits
To add a single portrait:
- Select the Folder where the new portrait belongs
- Click Upload
- Click Add Files or Drag & Drop the file
- Click the Preview/Info icon of the new portrait to add the person’s name.
- Enter the Portrait Data in the name fields.
- Click X when complete
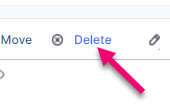
To replace an existing portrait:
- Repeat Steps 1-7 of adding a single portrait above
- Click the Checkbox on the old portrait
- Click Delete in the toolbar
To delete a portrait:
- Select the portrait
- Click Delete in the toolbar
Adding Multiple Retake Portraits
If you have a lot of late portraits, it may be easiest to create your own PSPA and upload them all at once. With a few easy steps, you’ll save yourself a lot of time.
To create your own PSPA for multiple late portraits:
- Open a new Excel file and save it as a .txt file called “Index” (here’s an example to get you started)
- Create a Column for each of the following categories:
- School Name
- Image Folder (which contains your portraits and/or placeholder image)
- Image File Name
Note: It is important that your image file names are EXACT, ex. IMG_100123.jpg. You can use the same placeholder image for multiple people. Their image name will just be the same. - Grade
- Last Name
- First Name
- Teacher
- Homeroom Teacher (if needed)
- Enter the information for each portrait to be uploaded
Note: If uploading staff members, their Teacher will most likely be “Staff,” and their grade will be “S” (but check to see how current staff members are set up in your book). - Save your index file once all students/staff members are filled out
- Place your saved Index.txt file in the folder with the portrait files
Tip: After your PSPA is complete, follow the Step by Step process for Importing Portraits.
Adding Placeholders for Missing Portraits
If you’d like to add students or staff with no portrait, you can upload a placeholder image in place of a portrait by following the instructions for adding a single portrait (see the first section of “Adding, Replacing, or Deleting Portraits”).
Tip: Get creative and use a piece of clip art that corresponds to your theme or your school mascot if you don’t want to use a blank person graphic. Find tons of free clip art graphics in the Studio Source Content Catalog.
Moving Teachers’ Portraits to the Front of the Class
If your teachers are in the same folder as the students, you can make them appear in the first position(s) on the class portrait page, or automatically flow into a larger teacher frame.
To specify a portrait is a teacher:
- Click the Preview/Info icon
- Click the Checkbox by Teacher Portraits

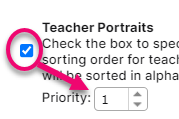

If there is more than one teacher portrait in a folder:
- Adjust the order in which they appear by selecting a number from the Priority Menu
- The priority for each teacher will appear on the portrait thumbnail in the portraits tab
- Portraits with the same teacher priority will appear on the portrait page in alphabetical order, within that priority level
Note that this feature can also be used in the staff folder to move senior administration to the top of the staff page.
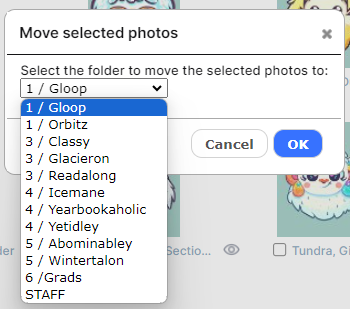
Copying or Moving Portraits to Another Folder
If a person needs to appear on two separate portrait pages (eg. an assistant teacher assigned to two classes), copy their portrait to the other group’s folder. If someone is in the wrong group, then move their portrait to the correct group.
To copy portraits to another folder:
- Select the portrait(s)
- Click Copy or Move, as applicable, in the toolbar
- Select a Folder in the dropdown menu
- Click OK
To move portraits to another folder:
- Select the portrait(s)
- Click Move in the toolbar
- Select a Folder in the dropdown menu
- Click OK