Face Matching, Coverage Reports & Indexes
Service notice: Face matching service was restored on February 6, 2025 (following an outage during December 2024-January 2025).
Pixami includes face matching technology. This opt-in service analyzes the portrait set, then identifies people in the candid image set. Face matching allows coverage reports and indexes to be generate with ease, replacing hours of labor to identify people in photos by eagle-eyed advisors.
How to Enable Face Matching
The following steps should be performed by a senior adviser assigned to the book – someone with final authority over the book who can confer with school administrators
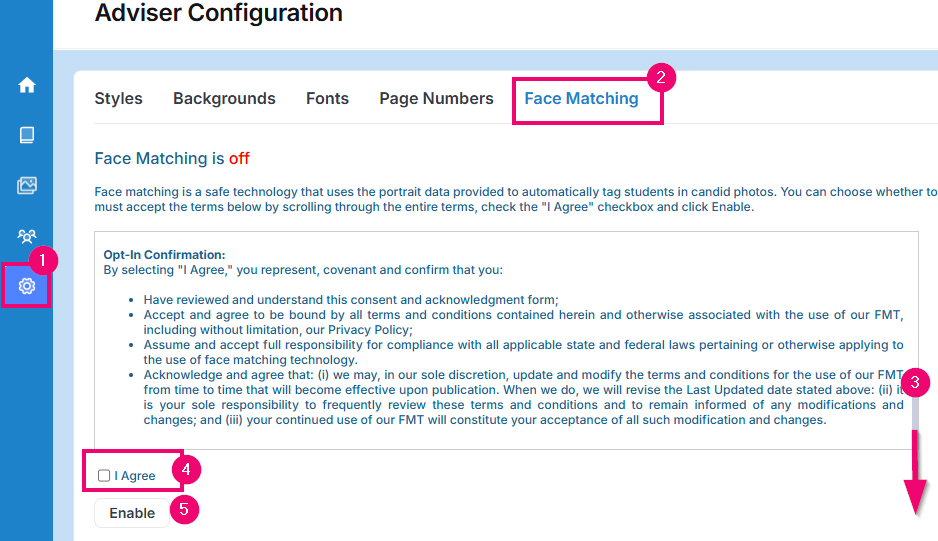
- Click on the Configure tab on the left-side menu bar
- Click on Face Matching on the top menu.
- Carefully review the Terms and Conditions, which are provided to ensure safe and legal use of the software. The adviser must confirm their understanding and acceptance of local and state guidelines related to this feature, so read the Opt-in Confirmation details carefully, and discuss with your administrators.
- Check the “I Agree” button.
- Click Enable to turn Face Matching on.
What Happens Next?
Your portraits will be mapped during the next few hours, and face matching data will start appearing in the candid photos whenever a match is detected.
Face matching status is displayed on the bottom right of Candid image folders. One of three statuses will be displayed:
- Face matching was run on a particular date. This date will update as the service continues to run on the Candids over time.
- Face matching has not yet run. Portraits will be analyzed within 2 days of their upload, providing that candid images have been uploaded.
- Face matching was never turned on.
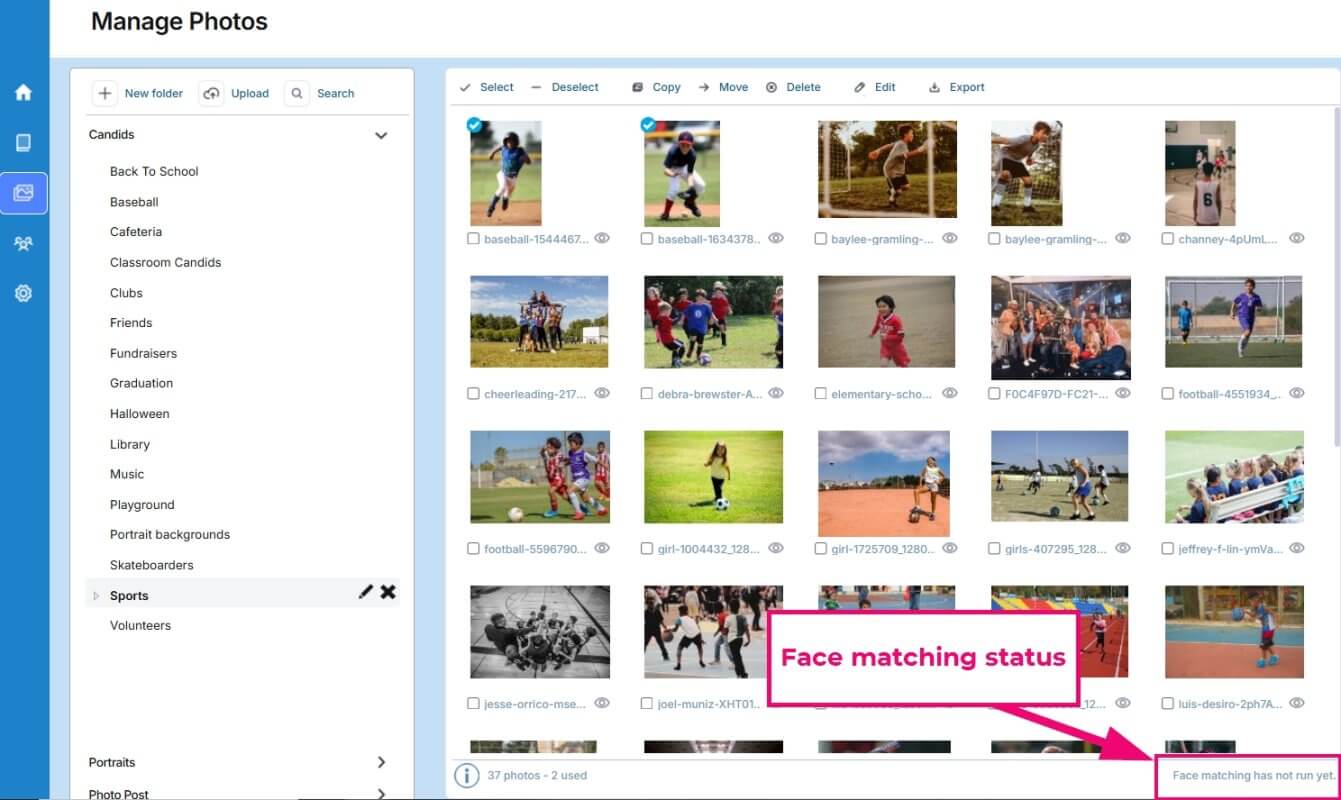

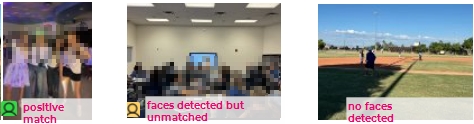
If face matching has run, Candid images will show either a green icon for matched faces, a yellow icon for unmatched faces, or no icon if no faces are detected.
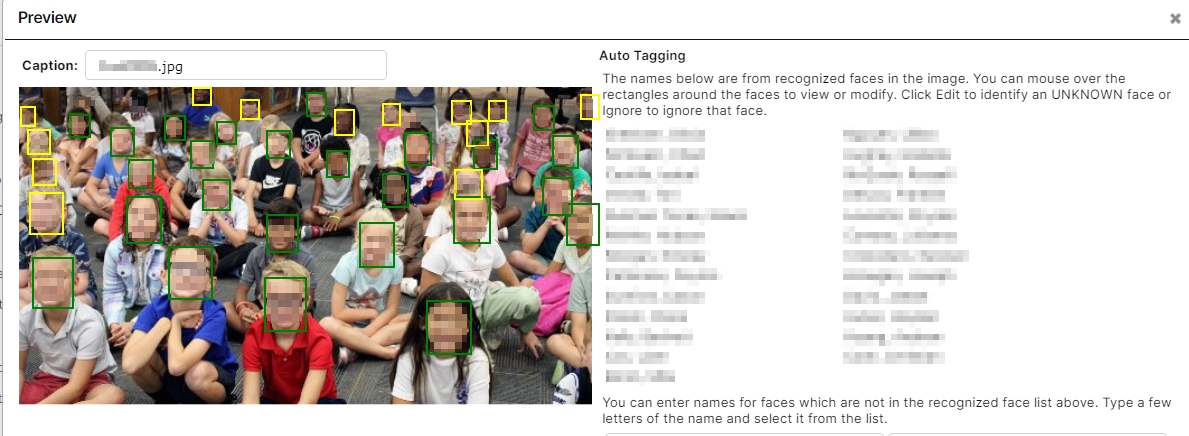
To review the matches, click on the preview icon of a candid image (eye icon). Click on any of the faces to see which faces framed in yellow to match them manually to a person. Note that the person must be present under the Portrait tab to be match — so be sure to add a placeholder image for anyone who missed portrait day that needs to be manually tagged.
Face Matching & Privacy
Face matching only uses name and photo data that has already been provided with the uploaded portrait set, applying this same information to candids for the purpose of saving time and improving accuracy. The information applied to the photos never shared outside of your yearbook software and subject to the same thorough and strict privacy policy that already exists for user data. It is hosted with the Pixami software in a secure, state-of-the-art environment at Amazon (AWS). Once the yearbook is completed, the data is delete along with the photos.
To learn more, download this printable pdf document from Pixami.
Coverage Reports
The Activity tab includes a detailed report used portraits and allowed you to generate a report to review which people have been added to particular pages.
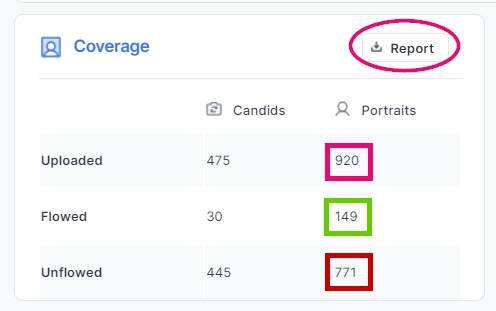
To check Coverage:
- Go to the Activity Tab.
- Scroll down to the Coverage area.
- Check the Portraits column to review the total number of portraits uploaded, the number flowed to pages, and unflowed (unused).
- Click the Report button and download the text-only results.
- Analyze the report to find people who do not appear on any pages or people who appear more pages than expected.
Index Pages
The Index feature allows you to create one or more pages listing all students in alphabetical order along with the page number(s) of the book in which they appear. Pixami’s face matching technology will help identify most students in the candid images.
Note: Your index formatting choices and the number of students will affect the number of pages needed for the Index Section. Add a few more pages to this section than you think you will need. You can delete any unneeded pages later.
To create an index:
- Go to the Yearbook Ladder
- Click + New Section
- Type Index in Section Name
- Enter the number of pages
- Select a Color
- Click OK
- Checkout the section
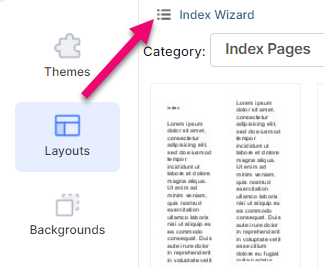
- Click the Layouts tab
- Select the Index Pages category
- Choose a layout
- Drag & Drop onto your pages
- Click Index Wizard
- Select Text Point Size
- Check the Box to add headers for the letters of the alphabet, if desired
- Click Create / Update Index
Important: The index pages do not auto-update as new images are added to your book. Always remember to update your index in the Index Wizard as a final step before submitting your book for proofing and approval to ensure they are up-to-date.