Book Ladder Management
When your yearbook is set up, it will be assigned a cover type and a maximum number of pages. The Adviser of your yearbook project should consult with your studio to know the exact number of pages as specified in your yearbook contract.
Note: Exceeding the number of pages allowed under your contract may incur additional charges.
Ladder planning tools
- For help deciding which sections to include in your yearbook, download our PDF topic checklist.
- If you would like to plan your ladder on paper, feel free to download this printable PDF form.
The Yearbook Ladder

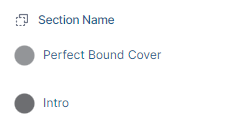
- A. Section Name: The name of each yearbook section
- B. Pages: Current number of pages in each section
- C. Numbers: Current page number range for each section
- D. Section Status: Current status of the section (See details below)
- E. Actions Toolbar: Set of features that allow you to arrange and modify sections (See details below)
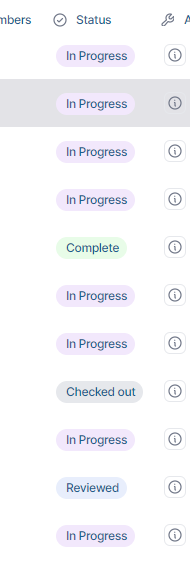
Section Status
The current section status will allow you to tell at-a-glance if the section is available for editing. There are four different section statuses:
- In Progress – The section has been started but not completed (Those who are Editors or assigned Staff members can edit)
- Checked Out – The section is currently being edited by someone, and cannot be modified by anyone else. Only one person at a time can check out and work on a section. Consult the Page Editor article to learn about saving & closing a section.
- Complete – The section has been submitted and is waiting for an adviser to review it and provide feedback (No changes can be made to the section until it has been Rejected by an Adviser and shows a status of In Progress)
- Reviewed – The section has been reviewed and approved by an adviser, and is ready to be printed when the other sections are complete (No changes can be made to the section unless it is Rejected by an adviser and shows a status of In Progress)
Tip: If a section is Checked Out, an adviser can click Force Check-In. The section will be saved and then checked in, where it will then be available for editing. However, if someone is still editing the section, this will cause their changes to be lost.
Actions Toolbar
The Actions Toolbar allows you to arrange and modify individual sections, assign sections to different users, check out sections for editing, and submit sections for review and approval. The set of available icons will change depending on the status of the section, and your specific user privileges.
Note: Please be aware that some icons will appear the same, but will be for a different action depending on the current section status. Pay attention to the pop up description when you hover over the icons.
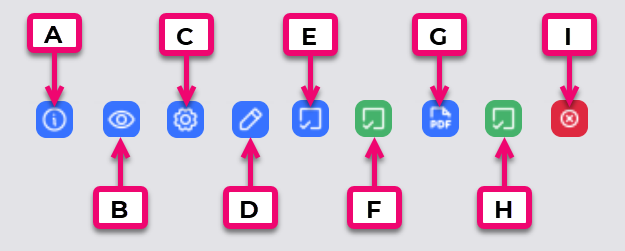
- A. Info/Messaging: View section history and add comments
- B. Preview: Shows a preview of the entire book (See Book Views below)
- C. Settings: Advanced section & page management functions for Editors and Advisers (See Section Management below)
- D. Edit: Allows you to Check Out a section and work on the design (See Page Editor Overview)
- E. Force Check-in: Allows advisers to check-in a section that is checked out (See Tip above)
- F. Mark Complete: Submits the section to the adviser for review (See Reviewing within Pixami)
- G. PDF Proof: Allows advisers to render a PDF to be printed (See Book Views below)
- H. Mark Reviewed: Allows advisers to aprove a section that was marked complete by the designer (See Reviewing within Pixami)
- I. Reject: Allows the adviser to reject a section to allow the designer to make changes (See Reviewing within Pixami)
Sections vs Pages
Sections are used to organize pages into different groups, topics, or themes.
A new yearbook project will include two Sections:
- The Cover Section
- The Intro Section
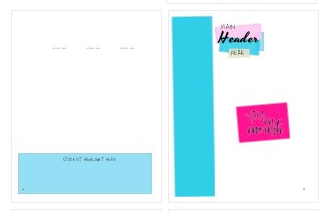
Pages are where you will add photos and design your book. The page previews are displayed in the section view. To learn more about the Section View, check out the article Navigating Pixami.
Note: The first page in your book is always a right-side page with no matching left-side.
Adjoining pages are displayed with a left and right side together called a Double-Page Spread.
When a double-page spread is divided into separate sections, you will see an empty space in the section view to the right of the left-side page. In the following section, an empty space will be shown to the left of the right-side page.
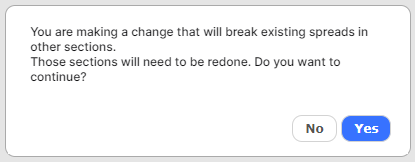
Broken Spread Warning: If you do anything to change the page count by an odd number, the updated section will potentially break a spread in subsequent sections.
In other words, left-hand pages will become right-hand pages, and right-hand pages will become left-hand pages. If you do this, a warning will appear asking you to confirm. You will not be allowed to break a spread if any of the affected sections have a status of Checked Out, Complete, or Reviewed.
Organizing by Sections
Adding all pages into one section can make editing difficult. We recommend organizing your pages into different sections, such as sports, clubs, and activities using Pixami’s Yearbook Ladder.
The Benefits:
- Improves workflow by helping you plan
- View pages in smaller groupings to easily see progress.
- Easily distinguish each section with different styling choices.
- Editing the flow of portraits is easier when dividing each grade into its own section.
- Assign specific Team Members to different sections.
- Easily change the order of the sections.
The size of your yearbook can help you determine how many sections you will need. Small yearbooks traditionally include standard sections such as Intro Pages, Staff Pages, Student Portraits, Graduates, Sports, Clubs & Activities, and Autographs. Larger yearbooks may add more sections to group their activity pages together efficiently.
Section Management
Adding a Section
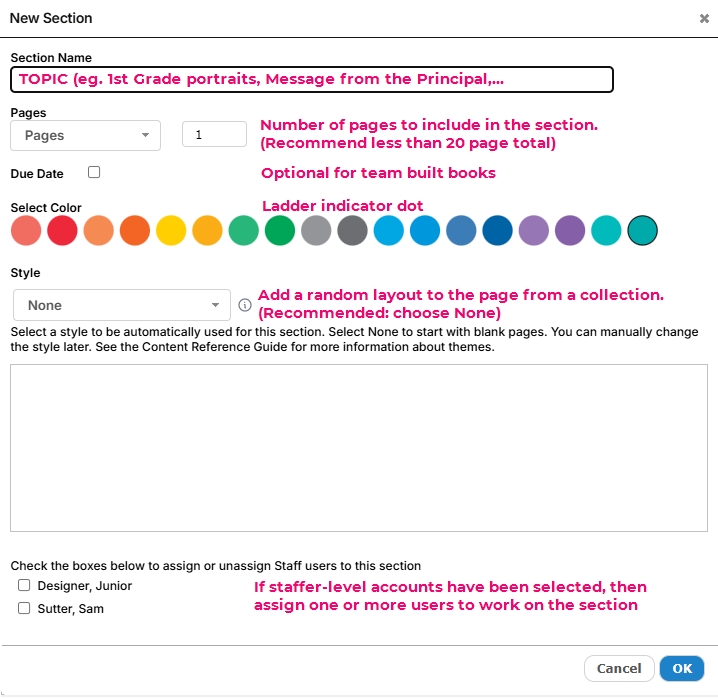
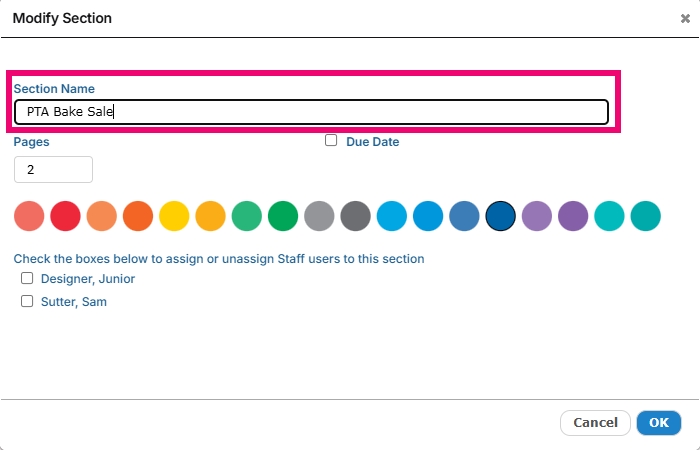
To add a new section:
- Click the + New Section button
- Type a Section Name
- Type how many pages you want in the section
- Select a Color Code to identify the section
- Choose a Theme for the section
- Click OK

Moving a Section

To move a section:
- Click the Section Name
- Drag and Drop to new location
We recommend moving the section in small increments up or down the ladder. If you attempt to drag it past the first or last section on the ladder, the section may freeze.
Warning: You may receive one or more messages when you try to move a section on your ladder.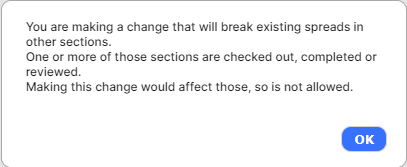
If you attempt to move a section with an odd number of pages, it will change the position of left- and right-facing pages, thereby breaking up double-page spreads. This warning will not block you from moving your pages, but check your ladder after completing the move to see if pages that should be side by side are now split apart. If you do find that spreads have been broken up, add or remove a page above the affected section – the pages will rejoin into a double-page spread design.
A section may not be moved around sections that are locked — checked out in the editor, marked as reviewed or marked as complete. Be sure that all sections have a status of “in progress” to be able to move your sections on your ladder. 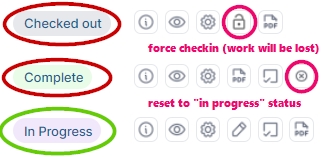
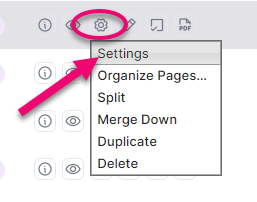
Renaming a Section
To rename a section:
- Click the Settings Menu
- Select Settings
- Type new name
- Click OK
Merging Sections
Two sections can only be merged if they are adjacent to each other on the book ladder, and only if each one has a status of In Progress. You cannot merge sections if either of them has a status of Checked Out, Complete, or Reviewed.
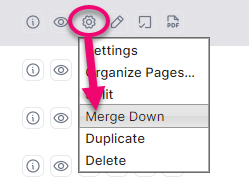
To merge sections:
- Click the Settings Menu
- Select Merge Down
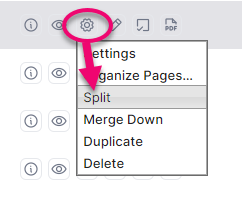
Splitting a Section
Split a section into two separate sections. You can only split a section with a status of In Progress.
To split a section:
- Click the Settings Menu
- Click Split
- Select which page to split the section (This page will be the first page of the new section)
- Click OK
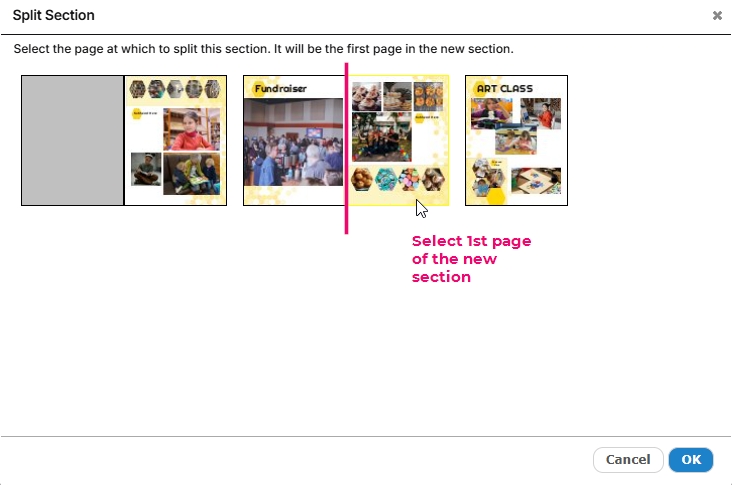
Tip: If you split off pages containing a portrait flow, you will need to reflow the portraits to ensure they are wired to the portrait database. Otherwise, any updates to the portraits in that section will not auto-reflow.
Duplicating a Section
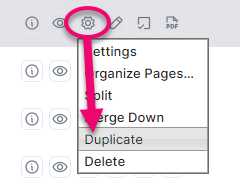
To duplicate a section:
- Click the Settings Menu
- Click Duplicate
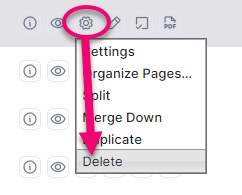
Deleting a Section
To delete a section:
- Click the Settings Menu
- Click Delete
- Click Yes
- Type YES to confirm deletion
- Click Yes
- Click OK
Important: Deletion of a section is permanent and cannot be undone.
Page Management
Adding a Page
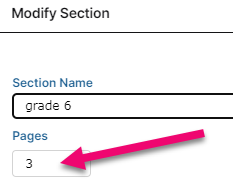
To add a page to a section:
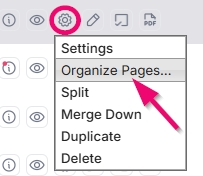
- Click the Settings Menu
- Click Settings
- Enter a new number of pages
- Click OK – the new page will appear at the end of the section
Note: Decreasing the number of pages here will delete pages from the end of the section. A warning will appear asking you to confirm. Once pages are deleted they cannot be retrieved.
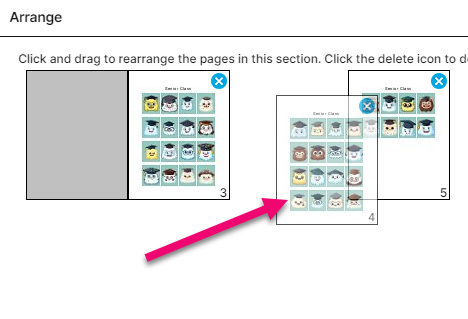
Rearranging Pages
To rearrange pages within a section:
- Click the Settings Menu
- Click Organize Pages
- Click and Drag the page to a new location
- Click OK
Deleting Pages
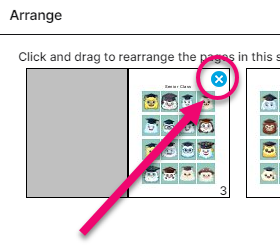
To delete pages in a section:
- Click the Settings Menu
- Click Organize
- Click the Delete Icon in the top right corner of the page
- Click OK
- Type YES to confirm deletion
- Click Yes
Important: Deletion of pages is permanent and cannot be undone.
Moving a Page between Sections
Moving one or more pages to a new section required multiple steps
- If required, click the Settings Menu – Click Organize Pages – Drag the page(s) that need to be moved to the end of the section.
- Click the Settings Menu – Click Split – Select the last page(s) to create a new section isolating the page(s).
- Drag the new section so it is right below the section where the page(s) should be located
- Click the Settings Menu – Click Merge Down
- If required , click the Settings Menu – Click Organize Pages – Drag the inserted page(s) into the correct order
Tip: Only use this method if the page(s) have content added to them. If the page(s)are blank, delete them from the original section, then add extra pages to the other section, then organize the pages if required within the section.
Page Quantity Limits
The maximum number of pages allowable in your book and the current number of pages is displayed on the Activity Page in the Yearbook Info box.
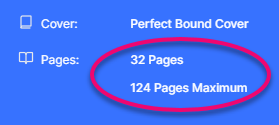
Note: Your school’s contract with the studio will stipulate an exact number of pages for the completed yearbook, which may be less than the maximum number displayed in Memento.
Primary account contacts who have access to the Studio Source Dashboard may check on their project’s contracted number of pages under their book profile information.
Tip: Contact your Studio to learn more about your maximum number of pages and cover type, or to request a change to either setting.
Additional Views on the Yearbook Ladder
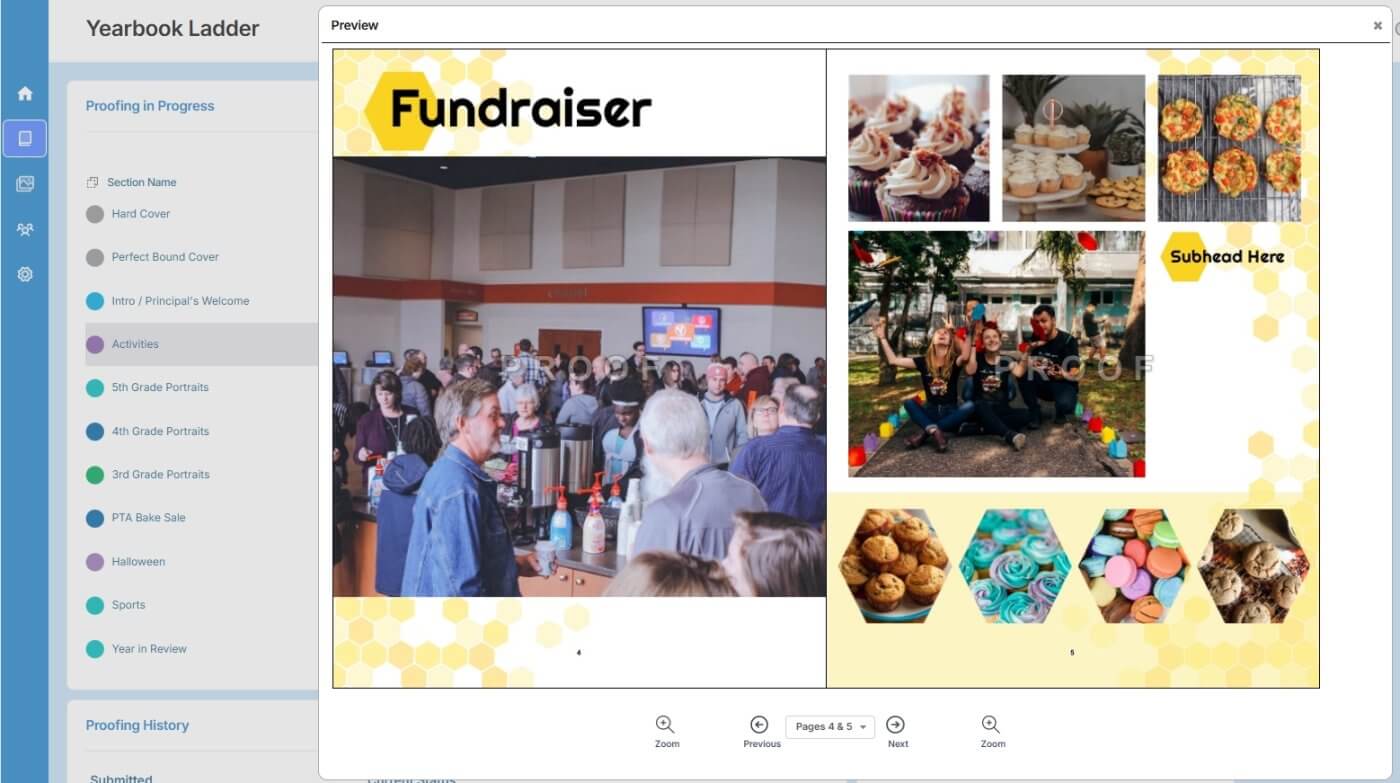
Book Preview

To see larger views of your pages, click Preview.
Note: Your pages can not be edited in this view, but you can see it in detail.
PDF Preview
PDF previews may be generated for the cover, a single section or multiple sections.
To generate a pdf preview:
-
- Click PDF Proof
- Click Select All to include all pages in the book, or checkmark individual sections to generate a single pdf for those pages alone
- Click OK to generate the pdf. Note that this may take a few minutes.
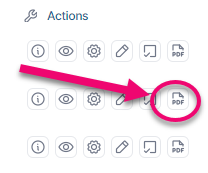
The pdf opens on a new browser tab, shown as a screen-friendly watermarked proof. While the pdf is not high-resolution and does display a watermark, you may DOWNLOAD button to receive a copy of the pdf file which you can share with other or PRINT it on your local printer, suitable for mark-up and notes.![]()
Tip: A PDF of the cover will have to be generated separately by clicking PDF Proof for the cover section.