 113898681
  128497289
  106815075
 Setting Up a Yearbook in Your Own Software
If your school has chosen not to use yearbook software provided by Studio Source, consult the steps below for a quick summary of what you will need to do to get your design project underway. The Studio Source yearbook planning guide provides much more detailed illustrated information on how to organized your entire yearbook project.
Some yearbook teams may prefer to use a familiar editing or layout software to avoid learning a new tool. Before committing to this decision, it is important to understand how yearbook software can facilitate your project. Yearbook software is generally easy to use and allows you to make a professional-looking book without complications. It offers many advantages that outweighs the time required to understand a new design tool.
- Your pages and cover always have the correct dimensions, margins, resolution and file formatting, ensuring error-free results.
- Your project is built as an album with “book logic” in place. Facing pages are indicated and page numbering automated, enabling you to move pages/sections on your book ladder without effort.
- Easily and safely collect photos to a shared pool, including access to a community photo upload link, avoiding photo management woes.
- Team management tools let advisers / editors-in-chief manage the project, assigning permissions and pages to junior team members and work with team communication tools (eg. calendars, task assignment, in-book proofing tools).
- Generate perfectly ordered and labelled portrait grids in minutes. Automated portrait tools immediately update your page should you need to add/remove people or correct typos.
- Low-res and used images are flagged ensuring that your book is high quality with no duplicate photos.
- All backgrounds & decorations are copyright-cleared and correctly sized, plus you can supplement these built-in collections with content from the Studio Source catalog.
- Submit your book to proofing in a couple of quick clicks, with individual pages to render, pdf files to compile or manual uploads.
- If any corrections are required, simply reject your proof to unlock the software. Make your changes, and resubmit in minutes. No files to recompile or team members needed to access their personal pages.
Step 1: Ladder Planning
Book design follows a particular logic:
- the first page is a right-side single page.
- the last page is a left-side single page.
- the pages in-between are facing doubles.
Hard cover and Perfect Bound Soft Cover books must be designed with a page count divisible by two; Saddle Stitch books must have a page count divisible by four. Be sure to consult your project specs on the Studio Source Dashboard or your yearbook contract to ensure you are planning a book with a correct page count and cover type.
Ladder planning tools
- For help deciding which sections to include in your yearbook, download our PDF topic checklist.
- If you would like to plan your ladder on paper, feel free to download this printable PDF form.
Step 2: Photo Gathering
Set up a photo management account to collect images for your yearbook. For example, set up a Google account to access Google Drive or Google Photos. Set up folders for activities and events, then invite teachers and families to upload photos into these folders. For other photo gathering options, talk to your IT person at the school.
For easy access backgrounds and decorations for your yearbook, we recommend using the Studio Source Content catalog, which is available to any user with an account on the Studio Source Dashboard. Content on this site is free to use in your yearbook, copyright cleared and correctly sized so the content is high resolution on your page designs.
Copyrighted / trademarked content may not be used in your yearbook. The Studio Source team specifically flags books for copyright violations, and will request amendments to the book to remove unlicensed content before printing. This is done to protect your school and all involved parties from potential lawsuits. We recommend using graphics provided in the Studio Source Catalog and Memento Yearbooks exclusively to avoid any
The following is not permitted without a specific usage license: Watermarked graphics • Characters, logos, art from books, movies, tv shows, websites, video games, etc. used in a decorative capacity • original art or photography used without the consent of the content license-holders (eg. celebrity photos, web downloads that are not public domain or commercially distributable by license, works created by independent artists used without their knowledge or consent, content from news outlets).
Fair use: Product logos or promotional materials may be used in an editorial (not decorative) capacity, or in original photography as an incidental inclusion at a public event. For example
- A page with the theme of Our Favorite Things may include small images of a movie poster, an album cover or a company logo, but it may not include a celebrity or news service photo.
- A Reading Across America page may include Dr. Seuss related content, such as original photos of an onsite banner, the event poster, books in a library, or kids in costume, but the page may not contain original Dr. Seuss artwork used as backgrounds or clipart.
Step 3: Page Design
Using your software of choice, create your cover and pages, but only after setting up the canvas to match the precise dimensions / resolution specified in the Cover and Page Dimensions article. These dimensions match the specs set by the manufacturers who will be printing your books, so it is critical that your designs follow the exact width, height, margins and content placement recommendations to avoid extensive redesign at submission time.
Step 4: Generating & Uploading a Proof
Prior to saving your files or exporting your project uploading your project as a proof, we strongly recommend pre-reviewing it using the Proofing Checklist article to catch and correct errors before submitting.
In order to submit your book to proofing on the Dashboard, it must be packaged as two 300 dpi PDF files:
- a single page cover file named SchoolName_cover.pdf
- a multipage interior pages file named SchoolName_pages.pdf. The interior pages must be formatted as single pages, not double-page spreads.
Only Studio users can upload pdf files to the Dashboard. If you are a school adviser, send the pdf files to your studio contact person.:
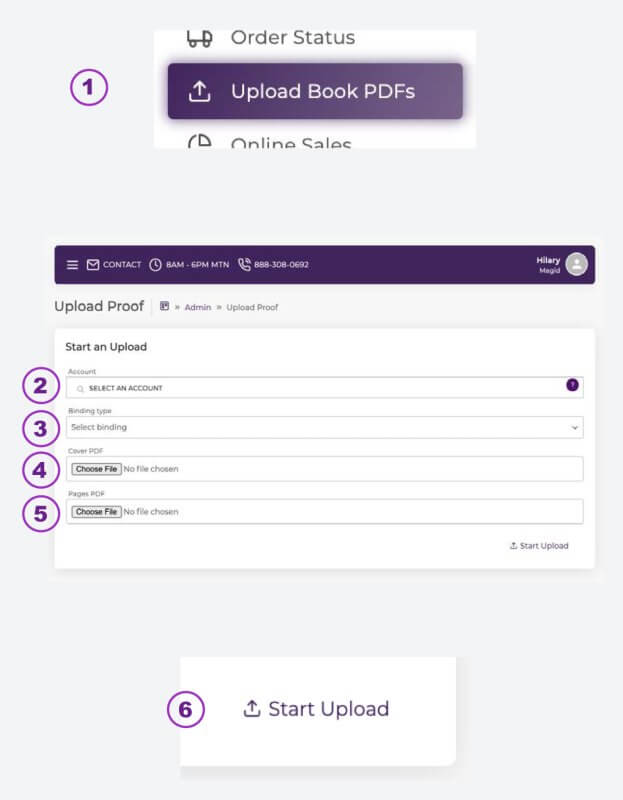
1. Select Upload Book PDFs from the left hand menu. Note that your studio may only have access to this option. If so, contact them to provide them to ask for assistance.
2. Click on the dropdown menu to select the name of your school.
3. Confirm that the dropdown menu displays the correct binding type(s).
4. Click Choose File to locate and select your cover file.
5. Click Choose File to locate and select your pages file.
6. Once you have selected both files, click the Start Upload button to begin your upload. Do not close the window until the upload is complete.
Once your upload completes, the Dashboard will begin processing the files. You and any other Dashboard users with proofing permissions on your school account will receive an email when your digital proof is ready to review. If it has been more than 60 minutes since your upload complete and you have not received notification that your proof is ready, contact the Studio Source Yearbooks support team.
For detailed instructions how to export pdf files from InDesign, download this guide.